Progress continues, now with a case!
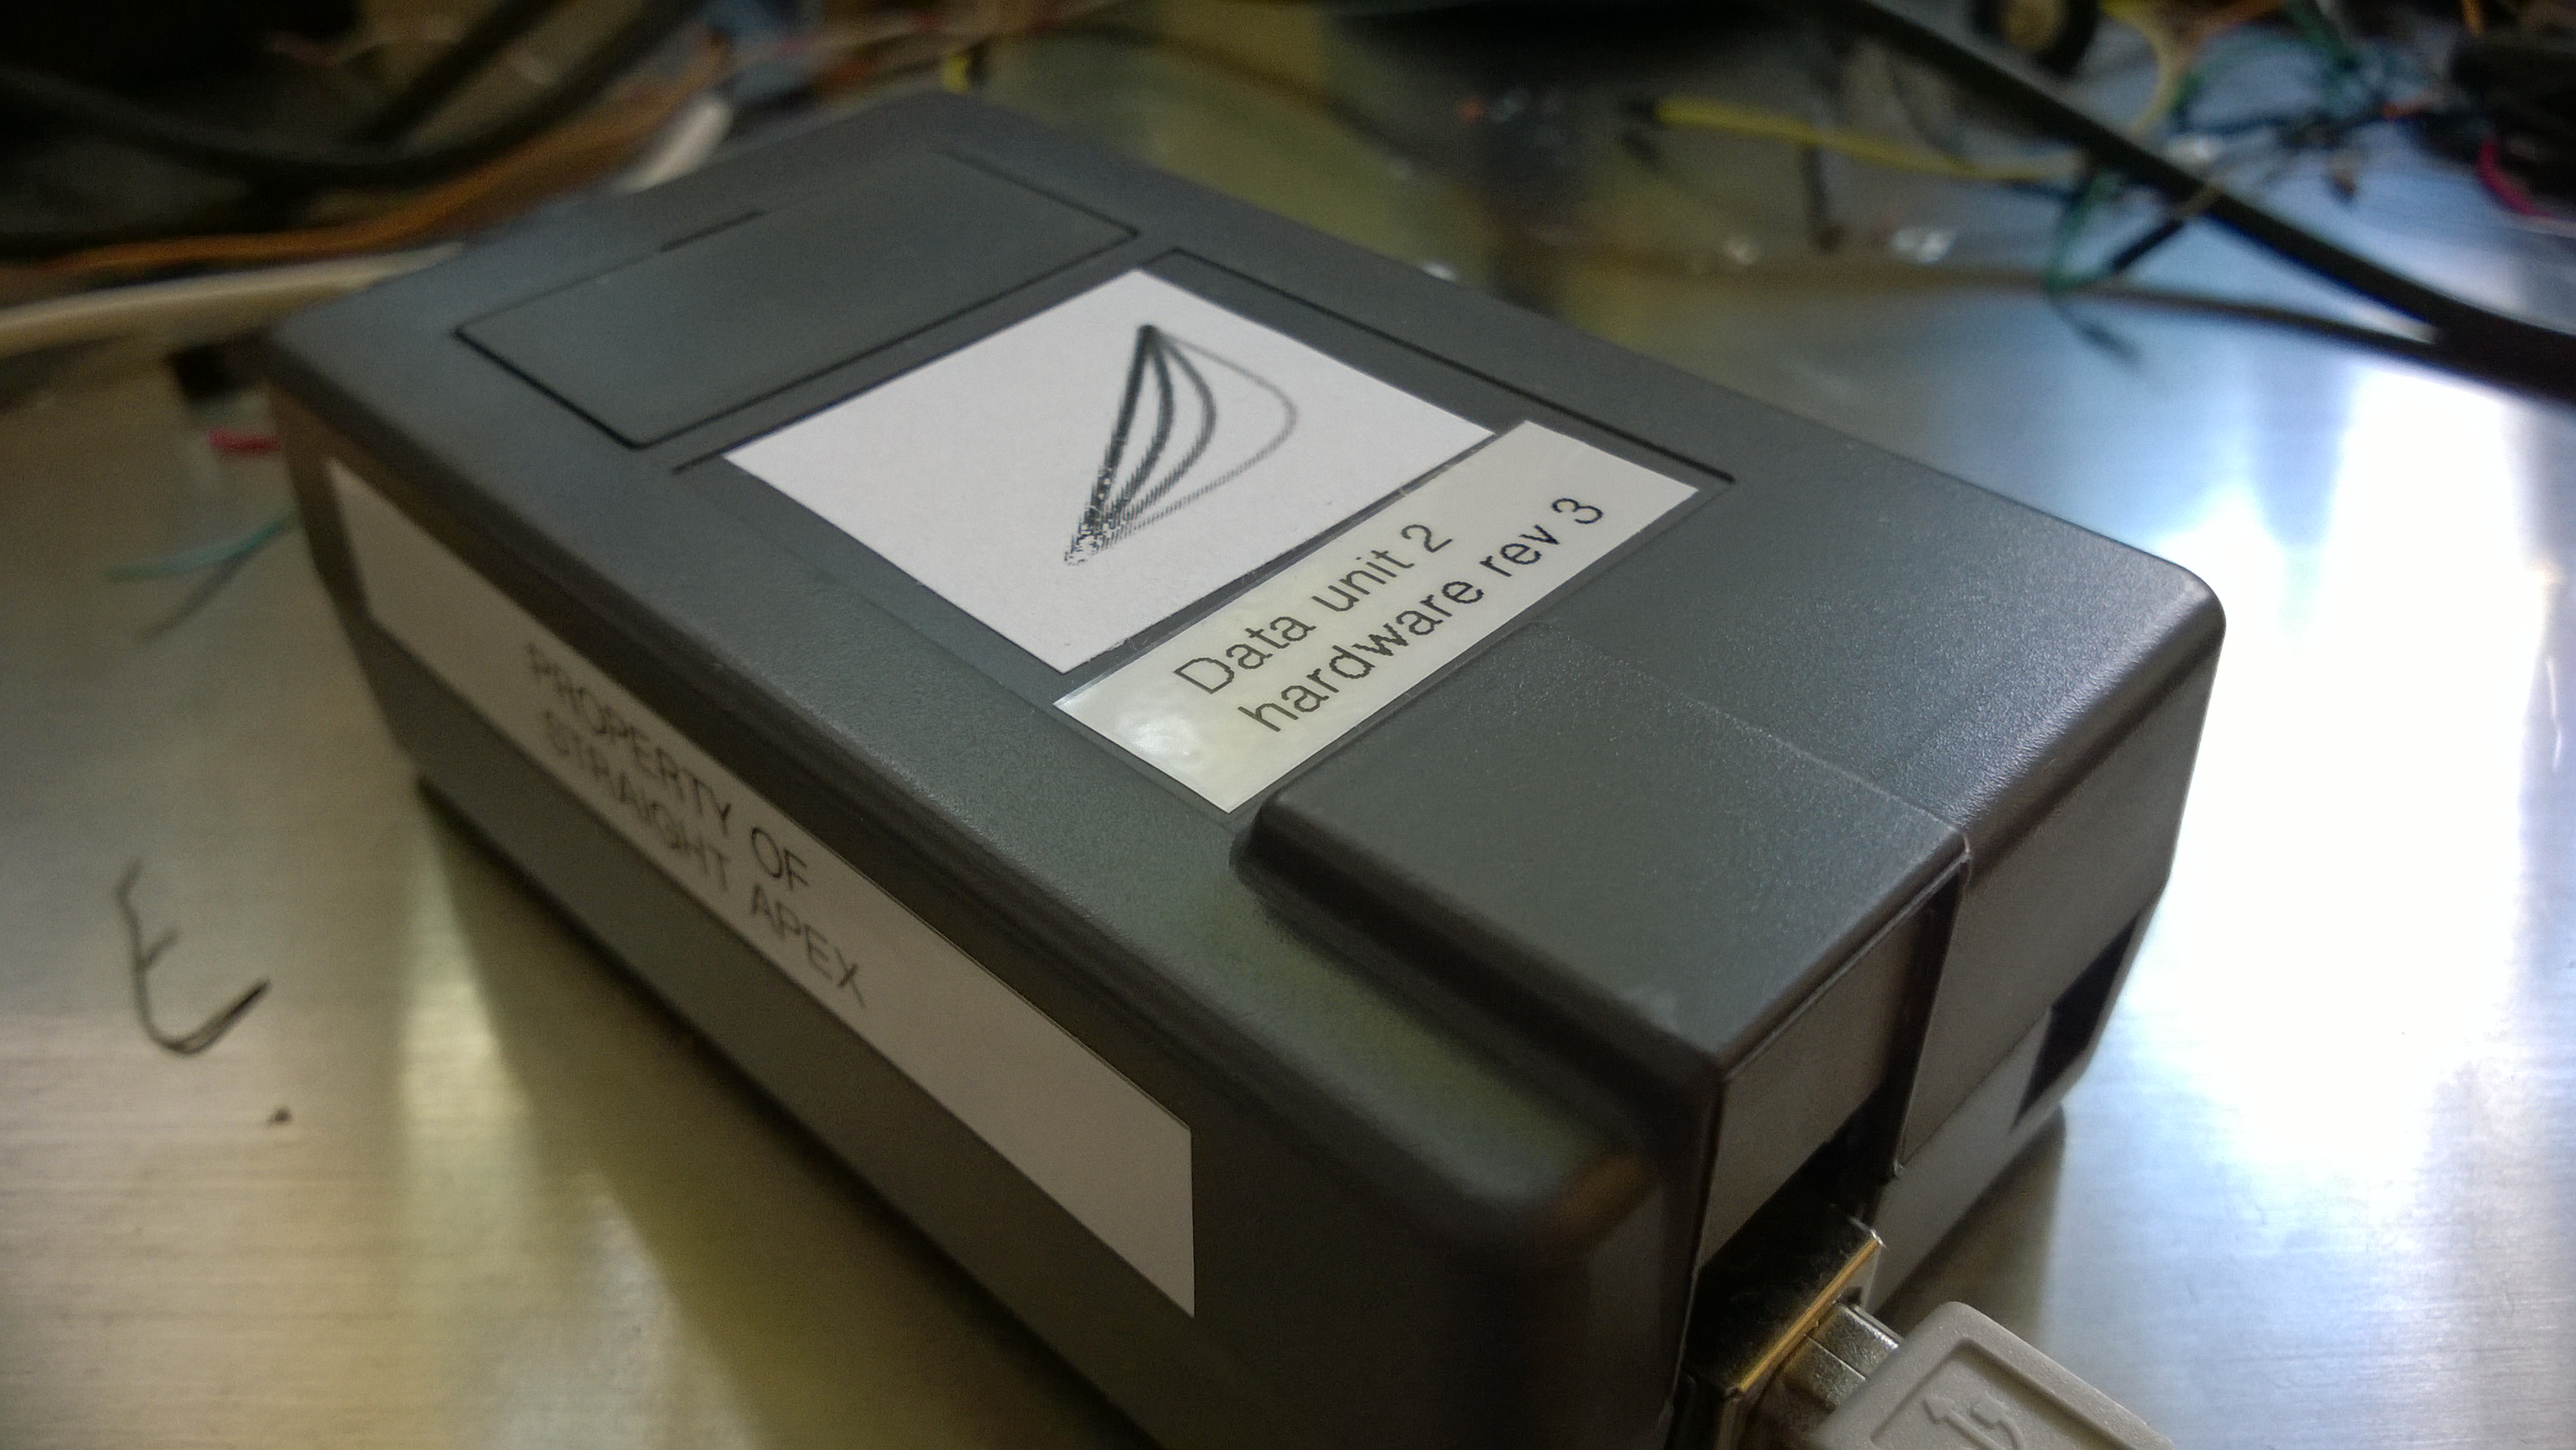
More info: http://straightapex.com/beta-unit-two-hits-the-road/
Progress continues, now with a case!
More info: http://straightapex.com/beta-unit-two-hits-the-road/
First iteration is working! More info at Straight Apex: http://straightapex.com/first-alpha-unit/
Say you make consumer broadband routers and you’re looking for a new revenue stream. Your customers expect you to spend money upgrading the firmware for their routers, but you’ve already taken money from them… they’ve paid already.
Don’t despair, there definitely are ways to squeeze more money out of your unsuspecting clients. For example: in your next router firmware update add a new feature that directs all mis-typed URLs to your own search page. Bingo! You get a brand new pipeline of money from all those paid search results and your customers will never know what hit them. Heck, they’ll probably think it’s spyware on their computers and spend a bunch of time trying to track down the bad bits and never even blame you!

Some tips:
One final tip: don’t name your search site “dlinksearch.com”, it will shorten the time it takes for your customers to figure out that it’s D-Link who is being a dick and stealing traffic. If you make it too easy for them to figure out who’s stealing the traffic, but hard for them to figure out how to turn them off they’ll get pissed off and make blog posts telling their friends not to buy your hardware (yes, I’m looking at you, D-Link).
But, hey, no big deal, right? They’ve already paid money for your router. Once you’ve made the sale the existing customers are just a drag on your revenue. You can make it up in volume.
Paula’s using my old laptop and Pa really needs to take it out back behind the barn with a shotgun. It’s slow, it won’t dock properly and I really don’t like the way it’s been looking at the toaster.
 This past weekend we finally bit the bullet and placed an order for a new laptop for Paula, the ThinkPad X61s. Paula’s top desire is small and light and this unit fit the bill (as well as came with a ton of awards to ease our minds). Sony and Toshiba have some very sexy laptops… but the price of the ThinkPad sold us (although we were both tempted by the pretty hardware). The total with shipping and tax: $1,989.93, a full $1000 less than the Sony.
We were very pleased with the results. Paula really wanted the Sony TZ, but once we added a dock, shipping and tax the price jumped up to $3,158.07. Lenovo had a sale on ThinkPads through October 1st making the price hard to beat. But it gets better…
Our order was delayed because I didn’t have my alternate shipping address (Leslie’s house) on record with my credit card. As part of the process I went back to the web site and what should I find? Lenovo started a new sale. Bad news normally, but good news for me since my order was still pending. I canceled the order and put in a new one. Ding! Saved $100!
But wait, there’s more. While I was admiring my new, lower total I noticed a blank line: “eCoupon”. I’m already getting a great price on this laptop (in my opinion)… they’re not going to allow me to apply a coupon to their sale price, are they? Only one way to find out… I type “lenovo ecoupon” into Live search and first result is for a coupon listing on Dealigg.com. I hop back over to my order and sure enough, my good deal just got better!
End result: the laptop I was pleased to get for $1,989.93 is being shipped to me for $1,527.22.
Oh, by the way, out of curiosity I went back and tried the same search on Google… the money saving coupon was seven links down. Thanks Live Search!
Intel recently commissioned Ziba Design to build a sexy laptop and I’d say they hit the target… and blew right through.
About as thin as a Motorola Razr, this magnesium shelled bit of geek pron is only 2.25 pounds, has back-lit keys and an optional leather folio cover sporting an external side show screen.


For more details you’ll have to check out Business Week’s write-up… at least until I find out the limb to fantasy hardware exchange rate.
Okay… what have I learned today?

Okay, what ruined my day you ask? This morning, before going into work, I did a quickie web search to see if there were Vista-compatible drivers for my RAID card. This weekend I plan on installing Vista on my home machine and I realized I needed to lay some groundwork first… like making sure there were drivers for the various bits of hardware I have. So, there are Vista drivers, Yay!
So, genius boy here decides to download and install the new driver at 7:30 in the morning before going to work. Heck, it’s for the card I have, no need to worry about something going wrong (sure, it seemed perfectly reasonable at the time). A quick install and reboot later and my 500 gig music drive is suddenly two 250 gig, unreadable drives. I almost cried.
Knowing I had to go to work and didn’t have time to futz with the damn thing I just shut down, kicked myself, packed up to go to work, then kicked myself again.
The worst part of it all was that as soon as I wasn’t focused on a task at work my mind would wander and …
“CRAP!!!! I SO SCREWED MYSELF!!!!”
If I had only bought two 500 gig drives instead four 250 gig drives the failure would have been no big deal… I’d have had two identical copies of my data (see rule number four above). Given my RAID array wasn’t fully bullet-proof (and running just fine, thank you very much) I really shouldn’t have even played with it in the first place (see rule’s number one and three). And so on…
All day I kept re-living my idiocy. As soon as I could reasonably leave work I came straight home (panicking again every time my mind would wander at a stop light), dropped my coat just inside the front door and ran straight upstairs to sit down in front of my computer… the machine which I had so unceremoniously raped this morning.
I tried a couple of things, each requiring what seemed a stupendously long reboot time. It’s amazing how painful it is to watch what usually seems a reasonably quick boot time when you’re imagining your entire CD collection going through a digital paper shredder.
In the end I did what I should have done first thing this morning, I used system restore to put my machine back in the state it was before I installed the drivers this morning. Well, actually, what I should have done first thing this morning was poke myself in the eye with a pencil, and then kick myself for even considering updating the drivers for my RAID card when there was nothing wrong with it’s operation to begin with, followed by poking myself in the other eye to ensure I was unable to see well enough to screw myself.
Honestly, sometimes I have the common sense of a small soap dish.
Larry Larsen has posted some very cool videos of him playing around at home with eye tracking hardware. He has some videos of him playing xbox games with eye position overlayed but I found the roller coaster video the most interesting by far (it vividly demonstrates how strongly we are drawn to look at people’s eyes).

It has been a long time since the PC world migrated away from churning out beige boxes, but major manufacturers have been slow to adopt industrial design standards which can keep up with clean, well-thought-out hardware produced by Apple. There have been periodic flashes of inspiration from Sony and Shuttle, the results, however, have been inconsistent.
With the advent of the Intel-based Mac, speculation of Windows running on an Apple Macintosh has, of course, abounded. With Apple’s latest announcement of “Boot Camp”, an app which allow an Intel-based Mac to dual boot to Windows and Mac OS, we’re sure to see increased adoption of the Mac platform. Users who are willing to pay the premium price of a Mac will no longer have to worry about the issues of incompatibility with the business world.


Seriously, which computer do you thing a grownup is going to buy? (Sorry Michael Dell)
Ok, I admit it, smart women make my nerd beanie spin. Brains wins over cheesecake, no doubt about it. If, however, someone tells you smarts and style are incompatible you can give them your best Urkle laugh and walk away.
Here’s a cool thing, laptop bags just for women.
While I may have ridiculed the idea someone would want to put their cell phone in a briefcase pocket which blocks out incoming RF (and, presumably, incoming calls) I do have to commend Mobile Edge for spotting a need: laptop bags which don’t look like laptop bags.
To be sure my super-powered geek-vision wasn’t clouding the issue, I checked with my better 50% (who is a history geek, band geek and photogenic fashion plate). The verdict? Paula agrees, these are great looking bags.
Check out Mobile Edge’s line of women’s bags. If I were a woman (or cross-dresser) I’d totally go right out and buy one of these.

Pick a trip you took from, say, two years ago. Take a look at the pictures. Do you remember where each picture was taken? Exactly where? Great, do you think you’ll remember that 10 years from now? Don’t worry, there’s a soution (provided you don’t loose all your digital pictures in both hard drive failures you’re statistically likely to have between now and then).

My picture location on a satellite map? How cool is that?
One of the nifty bits of data that can be embedded in a pcture’s EXIF data is the longitude and latitude of where the picture was taken. Adding this data to your pictures is called “geotagging” or “geocoding”. While it’s not hard to manually add this data to your pictures, you can also automatically add it if you have a GPS or an expensive camera.
EXIF: Exchangeable Image Format – descriptive data embedded in an image. This data is typically inserted into a JPEG image by a digital camera and contains information about the type of camera which took the picture, the shutter speed and date the picture was taken. A variety of free and commercial tools are available to allow you to view and edit EXIF data.
Okay, that sounds cool and all that… but so what? Why can’t you just write down the information? Imagine a slide show that walks along the path of your vacation, showing the pictures overlaid on a satellite picture of the area. When we went hiking in Switzerland I took a GPS along and here’s an example of what Geotagging can get you: http://maps.smugmug.com/?feedType=geoAlbum&Data=859458 (look for a link to “play” in the right-hand column). It is a large gallery (around 370 pictures) so it takes time to both load and play, be patient. Tip: you can zoom in and out while the slideshow plays.
When you add location stamps automatically (which I’ll discuss later) you’ll likely still need to adjust some of them manually, so let’s start with the process of manually adding or adjusting the geotag of a picture. First, got get some software (don’t worry, it’s free and easy to use). Microsoft Research, as part of their cool World Wide Media Exchange project, created a set of free tools for adding and reading tags.
First thing you need: Location Stamper. Location Stamper requires you have the Microsoft .NET Framework 1.1 installed, so I suppose that is really the first thing you need… but I digress. Go to the WWMX download page and follow the instructions to install the .NET Framework (step 1) and WWMX Location Stamper (from step 3). Don’t worry about any of the other software on that page at this time.
Now, let’s stamp a picture. Launch WWMX Location Stamper and select a picture from your collection by choosing “Add Photos…” from the “Photos” menu. You can select one or more pictures at a time, but let’s start with just one. The picture will show in the right-hand column of the Location Stamper interface. At the bottom of the interface is a box to perform a “Location Search”; type in the address where the picture was taken. Since Location Stamper will search the whole world, try to be as specific as possible, separating the information with commas (for example: Street, City, State, zip or City, country). To get the location more exact, use the plus/minus icons to zoom in and out and use the white arrows at the edge of the map to pan the map.
To add the geotag, simply drag the picture from the photo area onto the correct location in the map and drop. A small dot will appear on the map showing you the location stamped into the picture.

Location stamper, with images ready to be stamped.
I mentioned before that you could buy a camera with a built-in GPS, but I don’t recommend them unless you have a distinct business need (e.g. you’re an insurance adjuster). The cameras with built-in GPS are expensive and likely to become out of date very quickly. The best route to go is to buy a GPS with a computer interface. If you have a GPS it will work with any camera you have. In our case we take two cameras on every trip, a large digital SLR for nice artistic shots and a little, pocket camera for convenience. Having an external GPS allows us to stamp pictures from both cameras.
Step one: get a compatible GPS. There are likely a number of GPS units which will work, but I can tell you for sure that the Garmin Geko 201, 301 and Foretrex 201 all work for this purpose. The keys are: a) a GPS that can connect to your computer and b) a GPS that allows track data to be downloaded in GPX format. If you’re going out on your own to pick a GSP unit, look for a unit that advertises the things above as well as good battery life and quick satellite acquisition (my two-year old Geko 301 eats batteries and can take forever to get a fix on its location). The Garmin Geko 201 will run you about $120 new, the Forerunner 201 about $115. You’ll also need a cable to connect your GPS to your computer (it’s not a standard item with most GPS units).
Step two: turn on your GPS and allow it to get its bearings. If you’re sitting inside, next to your computer, you may have trouble getting a good signal. Stop reading this and go outside. 😉
Step three: set your camera’s clock to be as close to the time displayed on the GPS as possible. This is important because the location of the picture will be based on correlating the picture time to the GPS time. Another thing to keep in mind: if you travel out of your home time zone you will need to perform some added time zone magic to get the pictures to line up correctly with the GPS data (I’ll discuss that later).
Step four: take some pictures. With the Garmin GPS units (and with many other types as well, I suspect) you don’t really need to do anything other than turn them on. The GPS will automatically start keeping a “breadcrumb” trail of your path over time. This trail will stay in memory even if you turn off the GPS and take out the batteries. You don’t need to save a track log unless you are running out of memory (in fact, it’s best if you can avoid saving track logs as the breadcrumb trail tends to be more detailed).
After you get your new (or break out your old) GPS and spend some time running around and taking pictures you’ll need to get the GPS data off the receiver and onto your computer. The easiest way to do this with the Garmin units is to use the free GPS Track Download software from Microsoft Research (there are commercial applications, but once again, I’m cheap). Follow the instructions on the WWMX download page to install the GPS Track Download software.
The Track Download interface is very minimal. From the window select the type of data you want to download (I download track log and routes each time). Next choose “download from device” from the action menu and select a location on your hard disk to save the GPX data. You’re done with your GPS and Track Download for this session.

Ready to download tracks from your GPS device.
If you haven’t already, download all your new pictures from your first location-tracked photo shoot (put them in a new folder for simplicity). Launch Location Stamper and add all the new pictures (do this by browsing to the new folder, clicking a single picture, typing ctrl-a on the keyboard to select all and then hit the “Open” button). Next, add tracks to Location Stamper by selecting “add tracks” from the “Tracks” menu. You’ll see lines appear on the map pane as the GPX data is read in. Finally, click the “Apply tracks…” button at the bottom of the picture pane.
About the apply tracks options: I find the best options to use are the options to set the location but put in a tricky cases bin, always prefer existing location information and save a backup copy.
Those are the basics. Now that you have locations coded into your pictures here are a couple of cool things to do:
There are a couple places where things will get out of sorts when geotagging pictures:
Update: WWMX Location Stamper is now downloadable directly from MSR, a lot easier than digging into the source of the WWMX page for the hidden link.